> ## Documentation Index
> Fetch the complete documentation index at: https://magica.com/docs/llms.txt
> Use this file to discover all available pages before exploring further.
# Authentication
> How to authenticate with the Magica REST API.
All API endpoints require authentication via a Bearer token in the `Authorization` header. Keys start with the `gx_` prefix.
***
## Using your API key
```bash theme={null}
curl https://api.magica.com/api/v1/models \
-H "Authorization: Bearer gx_your_api_key"
```
```javascript theme={null}
const res = await fetch("https://api.magica.com/api/v1/models", {
headers: { Authorization: `Bearer ${process.env.MAGICA_API_KEY}` },
});
```
```python theme={null}
import os, requests
res = requests.get(
"https://api.magica.com/api/v1/models",
headers={"Authorization": f"Bearer {os.environ['MAGICA_API_KEY']}"},
)
```
Create and manage keys from **Settings → API Keys** in the [Magica app](https://app.magica.com).
***
## Creating a key
Open [app.magica.com](https://app.magica.com) and sign in.
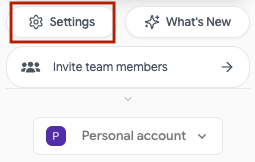
Click the **Settings** button at the bottom of the left sidebar.
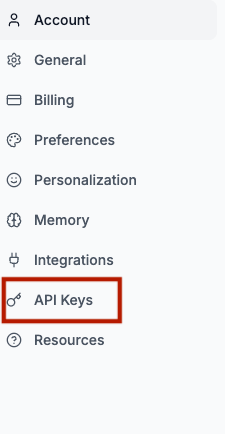
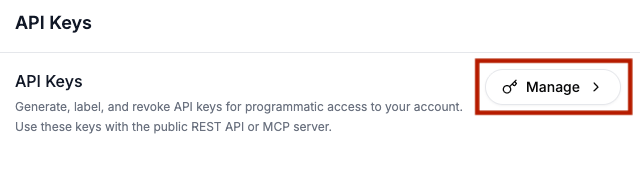
 Select the **API Keys** tab in the settings sidebar, then click **Manage**.
 Click **Create Key**, enter a label (e.g. "Production"), and optionally set
an expiration date.
Copy the full key immediately — **it's only shown once**.
The full API key is only displayed at creation time. Store it securely. If you
lose it, revoke the key and create a new one.
***
## Key properties
You can create up to **10 API keys** per account. Each key has its own label, rate limits, and optional expiration.
| Property | Description |
| --------------------------- | ------------------------------------------------------------ |
| **Label** | A unique name for this key (editable anytime) |
| **Prefix** | The visible `gx_...` prefix shown in the dashboard |
| **Rate limit (per minute)** | Max requests per minute for this key (default: 60) |
| **Rate limit (per day)** | Max requests per day for this key (default: 1000) |
| **Expires at** | Optional expiration date — key stops working after this date |
| **Created at** | When the key was created |
***
## Managing keys
Update label or rate limits from **Settings → API Keys**. Click the pencil
icon next to any key.
Click the revoke button next to any key. Revocation is immediate — requests
using that key start returning `401`.
Revoking a key does not affect other keys on your account. Your other keys
continue working normally.
***
## Key expiration
You can optionally set an expiration date when creating a key. After it passes:
* The key is automatically invalidated by the system
* API requests using the key return `401 Unauthorized`
* The key shows an "Expired" badge in the dashboard
* You can revoke expired keys to clean up your list
Use expiration dates for temporary integrations, CI/CD pipelines, or
contractor access. For long-lived production keys, leave the expiration empty.
***
## Rate limits
Each API key has its own rate limits that you can configure:
| Limit | Default | Range |
| -------------- | -------------- | ----------- |
| **Per minute** | 60 requests | 1 – 10,000 |
| **Per day** | 1,000 requests | 1 – 100,000 |
When you exceed a rate limit, the API returns a `429 Too Many Requests` response with a `Retry-After` header:
```json theme={null}
{
"error": "Rate limit exceeded. Please try again later.",
"message": "Rate limit exceeded. Please try again later.",
"code": "RATE_LIMITED",
"traceId": "req_..."
}
```
Rate-limit info is included in response headers:
| Header | Description |
| ----------------------- | -------------------------------------------------- |
| `X-RateLimit-Remaining` | Requests remaining in the current window |
| `X-RateLimit-Reset` | Timestamp (ms) when the rate limit resets |
| `Retry-After` | Seconds to wait before retrying (on 429 responses) |
Use exponential backoff when retrying after a 429. If you consistently hit
limits, raise the rate on that key in the dashboard, or create separate keys
for different services.
***
## Error responses
| Status | Meaning |
| ------ | --------------------------------------------- |
| `401` | Missing, invalid, revoked, or expired API key |
| `429` | Rate limit exceeded |
```json theme={null}
{
"error": "Invalid or expired API key.",
"message": "Invalid or expired API key.",
"code": "UNAUTHORIZED",
"traceId": "req_..."
}
```
Click **Create Key**, enter a label (e.g. "Production"), and optionally set
an expiration date.
Copy the full key immediately — **it's only shown once**.
The full API key is only displayed at creation time. Store it securely. If you
lose it, revoke the key and create a new one.
***
## Key properties
You can create up to **10 API keys** per account. Each key has its own label, rate limits, and optional expiration.
| Property | Description |
| --------------------------- | ------------------------------------------------------------ |
| **Label** | A unique name for this key (editable anytime) |
| **Prefix** | The visible `gx_...` prefix shown in the dashboard |
| **Rate limit (per minute)** | Max requests per minute for this key (default: 60) |
| **Rate limit (per day)** | Max requests per day for this key (default: 1000) |
| **Expires at** | Optional expiration date — key stops working after this date |
| **Created at** | When the key was created |
***
## Managing keys
Update label or rate limits from **Settings → API Keys**. Click the pencil
icon next to any key.
Click the revoke button next to any key. Revocation is immediate — requests
using that key start returning `401`.
Revoking a key does not affect other keys on your account. Your other keys
continue working normally.
***
## Key expiration
You can optionally set an expiration date when creating a key. After it passes:
* The key is automatically invalidated by the system
* API requests using the key return `401 Unauthorized`
* The key shows an "Expired" badge in the dashboard
* You can revoke expired keys to clean up your list
Use expiration dates for temporary integrations, CI/CD pipelines, or
contractor access. For long-lived production keys, leave the expiration empty.
***
## Rate limits
Each API key has its own rate limits that you can configure:
| Limit | Default | Range |
| -------------- | -------------- | ----------- |
| **Per minute** | 60 requests | 1 – 10,000 |
| **Per day** | 1,000 requests | 1 – 100,000 |
When you exceed a rate limit, the API returns a `429 Too Many Requests` response with a `Retry-After` header:
```json theme={null}
{
"error": "Rate limit exceeded. Please try again later.",
"message": "Rate limit exceeded. Please try again later.",
"code": "RATE_LIMITED",
"traceId": "req_..."
}
```
Rate-limit info is included in response headers:
| Header | Description |
| ----------------------- | -------------------------------------------------- |
| `X-RateLimit-Remaining` | Requests remaining in the current window |
| `X-RateLimit-Reset` | Timestamp (ms) when the rate limit resets |
| `Retry-After` | Seconds to wait before retrying (on 429 responses) |
Use exponential backoff when retrying after a 429. If you consistently hit
limits, raise the rate on that key in the dashboard, or create separate keys
for different services.
***
## Error responses
| Status | Meaning |
| ------ | --------------------------------------------- |
| `401` | Missing, invalid, revoked, or expired API key |
| `429` | Rate limit exceeded |
```json theme={null}
{
"error": "Invalid or expired API key.",
"message": "Invalid or expired API key.",
"code": "UNAUTHORIZED",
"traceId": "req_..."
}
```