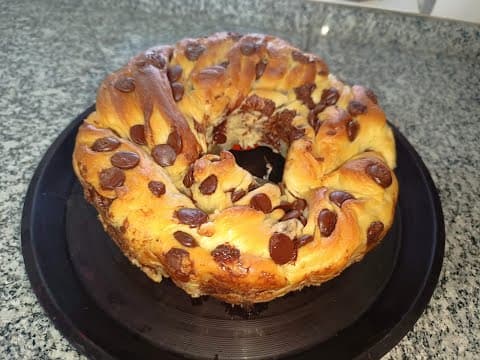
If you're looking for a delightful treat that surpasses anything from the bakery, this homemade chocolate rosca is the perfect recipe for you. With its fluffy texture and rich chocolate flavor, it's sure to impress your family and friends. In this guide, we will walk you through the entire process of making this delicious dessert.
Ingredients Needed
For the Sponge
- 150 g of flour
- 210 ml of warm water
- 6 g of biological yeast
For the Dough
- 350 g of flour
- 125 g of sugar
- 15 g of milk powder
- 120 g of butter (melted)
- 50 g of egg yolks
- 4 tablespoons of panettone essence
- 30 ml of water
- A pinch of salt
- 150 g of chocolate drops (blend)
Step 1: Prepare the Sponge
- In a mixing bowl, combine 150 g of flour, 210 ml of warm water (ensure it is not hot to avoid killing the yeast), and 6 g of biological yeast.
- Mix gently with a spatula until combined.
- Cover the bowl with plastic wrap and let it rest for 30 minutes. This step is crucial as it allows the sponge to develop air, which is essential for the dough.
Step 2: Prepare the Dough
- In a separate bowl, combine 350 g of flour, 125 g of sugar, 15 g of milk powder, 120 g of melted butter, and 50 g of egg yolks. It’s best to take the butter out of the refrigerator ahead of time to soften.
- Mix all the ingredients until well combined.
- After 30 minutes, the sponge should have developed some air. Add the sponge mixture to the dough along with 4 tablespoons of panettone essence and 30 ml of water, mixing gradually as the mixer runs.
- Knead the dough for about 15 minutes. If you choose to do this by hand, be prepared for a workout!
- Once kneaded, the dough should be smooth and slightly sticky. Transfer it to a greased bowl, cover with plastic wrap, and let it rest until it rises.
Step 3: Shape the Rosca
- Prepare your work surface by spreading some oil on it. This will help when rolling out the dough.
- Once the dough has risen, transfer it to the oiled surface and gently flatten it with your hands.
- Use a rolling pin to shape the dough into a rectangle.
- Sprinkle a pinch of salt over the dough to enhance the flavor.
- Evenly distribute the chocolate drops over the rolled-out dough (about 150 g).
- Roll the dough tightly into a log, leaving about three fingers of space at the edge. Cut the dough along the length to create strands for braiding.
- Braid the strands together, ensuring they are well intertwined to create a beautiful rosca shape.
Step 4: Final Rise and Baking
- Place the braided dough into a greased baking pan with a hole in the center.
- Allow it to rise for about an hour.
- Preheat your oven to 180°C (356°F).
- After the dough has risen, make a few cuts on the top and brush melted butter over these areas.
- Bake in the preheated oven for approximately 35 minutes. This is shorter than most cakes, so keep an eye on it!
Step 5: Cooling and Serving
- Once baked, remove the rosca from the oven and let it cool completely. This is important to prevent it from collapsing.
- After about 12 hours of cooling, carefully remove the rosca from the pan. If you used a non-stick spray, it should come out easily.
- You can choose to leave it as is or add more chocolate on top, depending on your preference.
Conclusion
This homemade chocolate rosca is not only a treat for the taste buds but also a fun baking project. With its fluffy texture and rich chocolate flavor, it’s bound to be a hit at any gathering. Enjoy your delicious creation and share your thoughts in the comments below!