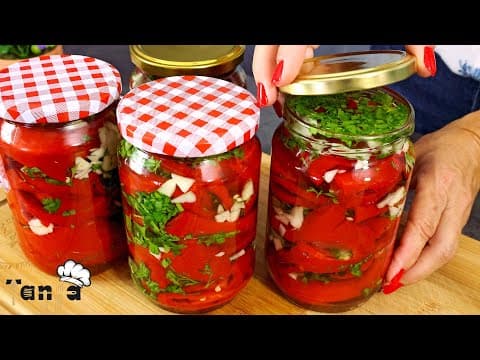
As the seasons change, many people look for ways to preserve the flavors of summer for the colder months. One delightful method is to roast and can peppers with garlic. This blog post will guide you through the entire process, ensuring you can enjoy this delicious condiment all winter long.
Ingredients Needed
- 2 to 3 kg of fresh peppers (washed)
- 200 ml of vegetable oil
- 4 tablespoons of 9% vinegar (plus more for cleaning)
- 2 to 4 teaspoons of salt (to taste)
- 2 heads of garlic (chopped)
Equipment Required
- Baking tray lined with baking paper
- Deep frying pan
- Sterilized jars and lids
- Pot for pasteurization
Step 1: Roasting the Peppers
- Preparation: Preheat your oven to 250°C (482°F). Line a baking tray with baking paper and arrange the washed peppers on it.
- Baking: Place the tray in the oven, positioning it closer to the upper heaters. Bake the peppers for 20 minutes.
- Turning the Peppers: After 20 minutes, turn the peppers to roast the other side and return them to the oven for an additional 5 to 10 minutes until they are nicely roasted.
Step 2: Cooling and Peeling the Peppers
- Cooling: Once roasted, transfer the peppers to a pot and cover them. Allow them to cool; this will make peeling easier.
- Peeling: After cooling, peel the skin off the peppers, remove the stems, and clean out the seeds. Quality peppers are easy to peel, fleshy, and have minimal water content.
Step 3: Preparing the Pepper Mixture
- Filtering: Place the cleaned peppers in a colander to drain excess liquid.
- Frying: In a deep frying pan, heat 200 ml of vegetable oil. Once hot, add the drained peppers and reduce the heat to avoid burning. Stir and fry for about 40 minutes.
- Seasoning: While the peppers are frying, chop two heads of garlic. Add the chopped garlic, 2 teaspoons of salt, and 4 tablespoons of vinegar to the frying pan. Adjust the salt to your taste, adding more if necessary, and continue frying for another 10 minutes.
Step 4: Sterilizing Jars
- Sterilization: Preheat your oven to 100°C (212°F) and sterilize the jars for 30 minutes. Sterilize the lids by boiling them in water for 10 minutes.
Step 5: Filling the Jars
- Filling: Carefully fill the sterilized jars with the pepper mixture. Ensure to leave some space at the top.
- Cleaning the Tops: Wipe the rims of the jars with vinegar to ensure a clean seal.
- Sealing: Place clean, new lids on the jars and tighten them well.
Step 6: Pasteurization
- Preparation for Pasteurization: Place a cloth at the bottom of a large pot and arrange the filled jars inside. Pour water into the pot until it reaches the height of the jar lids.
- Cooking: Bring the water to a boil and pasteurize the jars for 30 minutes.
- Cooling: After pasteurization, carefully remove the jars and allow them to cool gradually. Store them in a dark, cool place until ready to use.
Conclusion
Preserving roasted peppers with garlic is a simple yet rewarding process that allows you to enjoy the taste of summer throughout the winter months. By following these steps, you can create a delicious condiment that enhances many dishes. If you enjoyed this recipe, consider subscribing for more culinary tips and leave a comment with your thoughts!