
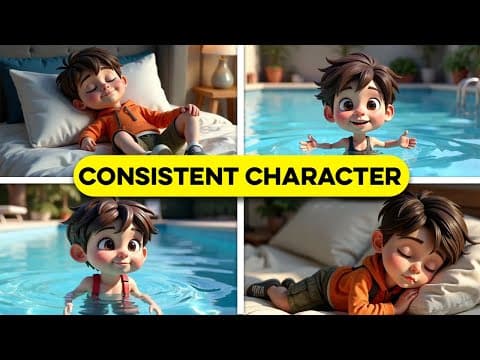
This blog post explores a new AI tool that simplifies the process of creating consistent character appearances across images, detailing step-by-step instructions on how to generate character sheets, train models, and animate scenes effectively.
Maintaining consistent character appearances across AI-generated images has always been a challenge. If you've ever tried creating visuals for a story, you probably know the frustration of having one image look perfect while the next features a character with a completely different hairstyle, outfit, or even face. Fortunately, a new AI tool has emerged that makes this process significantly easier, allowing users to keep their characters consistent across every scene and even turn those images into fully animated videos.
In this tutorial, we will walk through the steps to create a character sheet, train a consistent model, generate multiple scenes, and bring everything to life with smooth animations.
To begin, head over to the website linked in the description. Once on the dashboard, click on New Project. The first step is to select the right aspect ratio; it is recommended to use 16:9 as it provides ample space to work with.
Next, look at the left toolbar and click on Character. Here, you will find two tools: Character Sheet and Consistent Character. The Consistent Character tool requires you to provide training images of a specific character with uniform characteristics. Ensure that these images are high quality, watermark-free, and have dimensions of at least 512 pixels in both width and height. You can use between 1 to 30 images for training.
If you have already created your character, you can proceed directly to the Consistent Character tool. However, we will start with the Character Sheet tool to set the foundation for training your character model.
When creating a character sheet, it is crucial to describe your character in as much detail as possible. Include aspects such as:
The more descriptive you are, the better the results will be. After entering your description, select the aspect ratio again (16:9 is recommended) and click Generate. The AI will create multiple views of your character, including front, side, and other angles, all in one character sheet.
Once the character sheet is ready, hover over the images to preview each result. The next step is to isolate each character view into its own image. To do this:
After cropping, ensure that your images are high quality. With a layer selected, click the Fit to Content button to center the image, then go to the Enhance Tool and turn on Portrait Mode to keep facial details sharp. Select Standard Strength and hit Generate. Download the enhanced image and repeat this process for all layers.
Now that the images are ready, it’s time to train your consistent character model. Head over to the Consistent Character tool. If you click on Choose a Character, you will see some preset characters you can use to generate consistent images. You can try using one of these characters to familiarize yourself with how this tool works.
To add your own character, click on New Character, give it a name, upload the images you prepared, and click Train. This process usually takes about 30 to 40 minutes. Once finished, select your newly trained character, and you will see a default description that captures their main appearance loaded into the text prompt. It is important to keep this description to reinforce the character's details; otherwise, the results may not be as consistent.
Following the default description, you can add an action. For example, you might say, "he is sleeping soundly in bed." Set the aspect ratio again (16:9) and click Generate. The AI will create a new scene featuring your character, maintaining consistency in outfit, hairstyle, and features across every image.
However, sometimes the character's outfit may not fit the scene. For instance, if you want to create a swimming scene, simply changing the prompt to include a swimsuit will yield better results. Adding more details to your prompt can significantly improve the output. For example, instead of saying, "he is dancing," you could write a detailed description of the scene, such as:
"He is dancing energetically in a brightly lit room, his arms raised mid-movement and his legs bent as he performs a lively dance move, capturing the rhythm and motion with enthusiasm. The room features a wooden floor and is decorated with string lights and posters of musical artists on the walls, with sunlight streaming through a large window casting soft shadows that highlight his dynamic movements."
This level of detail will result in more cinematic and lifelike images.
Another feature of this tool is the ability to add text to your images. For example, you can adjust the prompt to say, "he is sitting by a large window gazing outside as sunlight streams in, casting soft shadows on the wooden floor. The room is decorated with string lights and posters of musical artists, creating a cozy and creative atmosphere. The title 'Dream Big' is in a flowing modern font with a slight glow, making it stand out against the soft background."
After adjusting the aspect ratio, click Generate to create an amazing cover for a story.
Once you have generated all the scenes you need, you can elevate your project by turning them into animated videos. To do this, open the Image Video Tool and set your starting frame to one of the images you generated. Describe the action you want, such as "the camera slowly zooms in as the character sleeps peacefully in bed." Use the imagination slider to control how closely the AI follows your description, adjusting it for more precision or creative freedom.
Choose your duration (5 seconds is a good starting point) and click Generate. The processing takes about 5 minutes. The results are impressive, with smooth and natural motion. If satisfied, you can download the clip to save it.
This new AI image generator provides a powerful tool for creators looking to maintain character consistency across images and animations. With features that allow for detailed character descriptions, scene generation, and animation, it opens up new possibilities for storytelling and visual creativity. The platform offers a free plan with 32 credits per day, along with beginner creator and master plans for those needing more resources. If you're interested in trying this tool for yourself, check the link in the description. Let us know your thoughts in the comments, and feel free to suggest more tutorial topics!



















