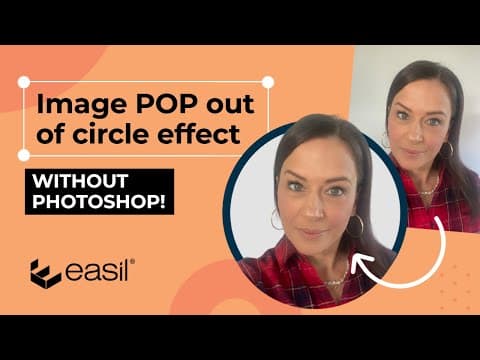
In this tutorial, we will explore how to create a visually appealing circle pop-out image effect using Easil, a user-friendly design tool. This effect has gained popularity among designers and social media enthusiasts alike, and the best part is that you can achieve it without using Photoshop. Let’s dive into the step-by-step process.
Step 1: Prepare Your Image
To start, you need to have an image ready for editing. Here’s how to prepare it:
- Drag and Drop: Simply drag and drop your chosen image from your desktop into the Easil workspace.
- Remove Background: Click on the right button to remove the background from your image. This will create a copy of your image with the background removed, making it easier to work with.
Step 2: Create a New Document
Next, you will need to set up a new document for your design:
- Select Template: Go to the templates section and choose a blank document. For this tutorial, we will select an Instagram post template, which is a square size.
Step 3: Add the Arch Shape
Now, let’s add the arch shape that will serve as the base for your design:
- Graphics Tab: Navigate to the graphics tab and search for an arch shape. Look for one that has a checkerboard pattern and a curve at the bottom, which will match the size and shape of your circle.
- Insert Image: Find the image you prepared earlier (with the background removed) and drag it into your design. At this point, you should see your image positioned halfway in the design.
Step 4: Add the Circle Shape
To create the pop-out effect, you will need to add a circle:
- Insert Circle: Go back to the graphics tab, find a circle shape, and drag it onto your design. Position it to match the bottom of your arch shape.
- Adjust Size: Stretch the circle out to fit your design and send it to the back so that it sits behind your image.
Step 5: Adjust the Image Position
Now, it’s time to adjust how your image interacts with the circle:
- Double Click: Double-click on your image to adjust its position. Stretch it out so that it appears to pop out of the circle. This is where the magic happens, as your image will now have a dynamic look.
Step 6: Customize Colors and Borders
To enhance your design further, you can customize the colors and add borders:
- Change Color: Select the circle by using the layers panel and navigate to the color tab to choose a different color. For this example, a gray color is selected.
- Create a Border: Duplicate the circle shape, stretch it out to make it larger, and send it to the back of the gray circle. This creates a layered effect with two circles.
Step 7: Final Adjustments
Finally, make any necessary adjustments to ensure everything aligns perfectly:
- Nudge and Resize: Adjust the size and position of your image so that it appears to be coming out of both circles. This will give your design a polished and professional look.
Conclusion
Creating a circle pop-out image effect is a straightforward process that can significantly enhance your visual content. With Easil, you can achieve this effect in just a few minutes without the need for complex software like Photoshop. If you enjoyed this tutorial and want to learn more about DIY design techniques for your brand, consider subscribing for more tips and tricks. Let us know in the comments what you would like to learn next!