In this guide, we will walk you through the essential steps to get started on your roofing project. This includes preparing the roof, installing underlayment, and laying down the starter strip and first row of shingles. Whether you are a DIY enthusiast or a homeowner looking to understand the process, this guide will provide you with the necessary information.
Preparing the Roof
Before you begin installing shingles, it is crucial to ensure that your roof is properly prepared. Here are the steps to follow:
- Strip the Roof: Ensure that the old shingles have been completely removed. This step is vital for a successful installation.
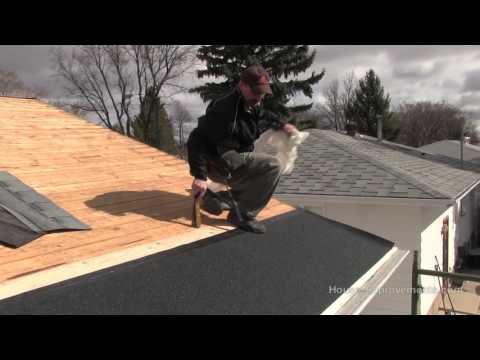
- Check for Protruding Nails: Go around the roof and make sure all nails are pounded down. Any protruding nails can cause issues with the new roofing material.
- Inspect the Roof Deck: Ensure that all boards are tight and solid, with no signs of rot. A solid foundation is essential for the longevity of your new roof.
Choosing the Right Underlayment
For this project, we will be using a product called Grip Guard, which serves as ice and water protection. Depending on your location, you may have different requirements:
- Some manufacturers do not recommend installing shingles over roofs with individual boards that have spaces. In such cases, you may need to sheet the entire roof with plywood.
- Always check with your shingle manufacturer to avoid voiding your warranty.
Installing the Drip Edge
Before laying down the underlayment, install a drip edge along the eave edge of your roof. If you are reusing an existing drip edge, ensure it is in good condition. If installing a new one, follow these steps:
- Choose an aluminum drip edge in your preferred color.
- Install it with a few shingle nails, ensuring it is secure.
Laying Down the Underlayment
Once the drip edge is in place, you can begin laying down the underlayment:
- Measure the Grip Guard: Measure the width of your Grip Guard material at each end of the roof to ensure it runs straight.
- Snap a Straight Line: Use a chalk line to mark where the Grip Guard will be installed, ensuring it overlaps the drip edge by at least one inch.
- Roll Out the Grip Guard: Start rolling out the Grip Guard along the marked line. This material helps prevent ice dams and water infiltration.
- Secure the Grip Guard: Use staples to hold the Grip Guard in place temporarily until it bonds down. The sun will help seal it to the roof over time.
Installing the Starter Strip
The starter strip is crucial for a successful shingle installation. Here’s how to install it:
- Choose Your Starter Strip: You can buy a starter strip from shingle manufacturers or use three-tab shingles turned upside down.
- Measure for Overhang: Ideally, the starter strip should hang over the drip edge by about a quarter inch. Measure and mark this on both ends of the roof.
- Snap a Line: Use a chalk line to create a straight guide for the starter strip.
- Nail the Starter Strip: Hand-nail the starter strip along the line, ensuring it is secure and straight. Use five nails per strip, nailing halfway up the shingle.
Installing the First Row of Shingles
With the starter strip in place, you can now install the first row of shingles:
- Select Your Shingles: For this project, we are using laminated architectural shingles.
- Align the Shingles: Start with a full-length shingle, aligning it with the starter strip.
- Nail the Shingles: Nail the shingles along the tar strip, ensuring you do not nail above it to maintain wind resistance. Use six nails per shingle, spaced evenly.
- Continue Along the Roof: Work your way along the roof, ensuring that the seams of the shingles do not line up with the seams of the row below.
Conclusion
This guide provides a comprehensive overview of how to get started with your roofing project, from preparation to the installation of shingles. Remember to always follow manufacturer guidelines and safety precautions while working on your roof. For further assistance or questions, feel free to reach out through forums or social media. Stay tuned for the next video, where we will cover additional roofing techniques and tips.