Gas furnaces are essential for heating homes, and at the heart of many of these systems is the Integrated Furnace Control (IFC). This component acts as the brain of the furnace, managing various functions to ensure efficient operation. When issues arise, knowing how to troubleshoot the IFC can save time and money. This guide will walk you through the proper troubleshooting procedure for a faulty IFC.
Understanding the Integrated Furnace Control (IFC)
The IFC is responsible for controlling multiple functions within a gas furnace. When the furnace fails to operate correctly, the IFC is often the first component to check.
Initial Setup for Troubleshooting
To begin troubleshooting, follow these steps:
- Access the Thermostat: Click on the thermostat icon located at the bottom right of the control panel. Set the subsystem selector switch to "heat" and increase the temperature setting.
- Refer to the Procedure Guide: Use the procedure guide available on the control panel to navigate through the troubleshooting steps.
Inspecting the Furnace
Next, you will need to inspect the furnace itself:
- Remove the Furnace Cover: Click on the furnace icon and remove the cover. Tape the door switch in place to ensure the furnace receives power while you perform checks.
- Check Electrical Loads: Verify which electrical loads are operating. The first component that should activate when heat is called for is the inducer motor. If it is not running, further investigation is needed.
Checking Power Supply
Measuring Voltage to the IFC
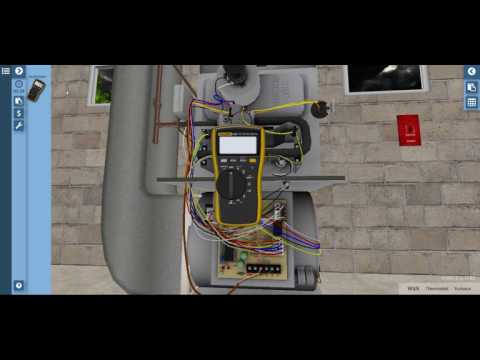
- Check for 120 Volts: Use a volt-ohm meter or digital multimeter to measure the voltage at the IFC. Set the meter to AC volts and place the leads on the designated terminals:
- Red lead on the hot wire from the door switch (terminal A13).
- Black lead on the neutral connection at the top right of the IFC.
- Evaluate the Results: If the IFC is receiving 120 volts, the issue is not with the breaker, service switch, or door switch. The problem may lie with the transformer, the first stage contacts, or the IFC itself.
Checking Low-Voltage Connections
- Measure 24 Volts at RNC Terminals: Place one lead on the R terminal and the other on the C terminal to verify the 24-volt output from the transformer.
- Check W&C Terminals: Move the lead from R to W to ensure that the thermostat contacts are closed and that 24 volts is returning through the white wire.
Identifying the Problem
If the inducer motor is not running, you need to check for 120 volts at the inducer motor:
- Measure Voltage at the Inducer Motor: Place the meter leads across the connection points of the inducer motor. If you measure 0 volts, this indicates a potential issue with the IFC or a loose connection.
- Tighten Connections: Ensure all connections are tight. If they are secure and you still have no voltage, the IFC is likely malfunctioning.
Replacing the IFC
If troubleshooting indicates that the IFC is faulty, it will need to be replaced:
- Order a Replacement: Click on the IFC icon and select the option to replace it. The cost for a new IFC is approximately $300.
- Install the New IFC: Follow the installation instructions provided with the new unit.
Final Steps After Replacement
Once the new IFC is installed, complete the following:
- Store Tools: Return the meter to the toolbox.
- Remove Tape from Door Switch: Click on the door switch and remove the tape.
- Replace the Furnace Cover: Click on the cover to secure it back in place.
- Restore Power: Turn the power back on by clicking the service switch.
- Clean Up: Ensure the work area is clean and tidy.
Conclusion
Troubleshooting a gas furnace's Integrated Furnace Control can seem daunting, but by following these systematic steps, you can effectively identify and resolve issues. Always prioritize safety when working with electrical components, and do not hesitate to consult a professional if you are unsure about any steps in the process. With the right approach, you can ensure your furnace operates efficiently and reliably.